
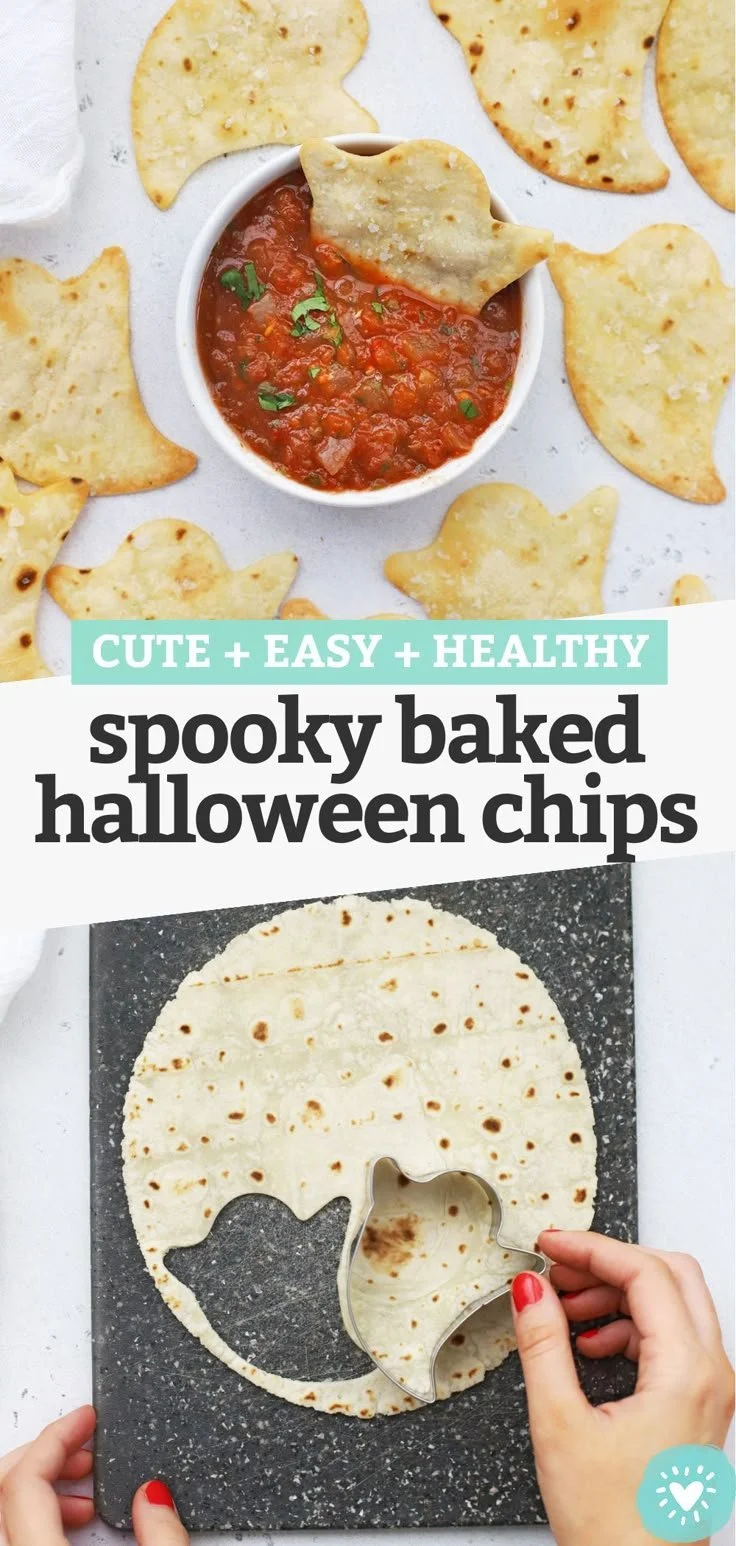
In the spirit of Halloween, these Spooky Baked Halloween Chips offer a fun and festive way to celebrate the season while snacking. Not only are they incredibly easy to make, but they also provide a wonderfully crunchy texture that pairs perfectly with your favorite dips. Plus, they are gluten-free and paleo-friendly, making them a guilt-free treat for everyone at your Halloween gathering!
Why You’ll Love Spooky Baked Halloween Chips
- Easy to Make: This recipe requires minimal effort and just a few simple ingredients, making it perfect for beginner cooks.
- Customizable Shapes: Using a Halloween cookie cutter allows you to create a variety of fun shapes, not just ghosts, to delight both kids and adults.
- Healthy Snack Option: Instead of store-bought chips, these baked tortillas offer a healthier alternative while still satisfying your crunch cravings.
- Versatile Dipping: These chips pair beautifully with a range of dips, from salsa to guacamole, making them a great addition to any party spread.
- Quick to Prepare: With a total prep and cook time of under 15 minutes, you can whip these up in no time for an impromptu gathering.
Recipe Overview
- Prep time: 5 minutes
- Cook time: 7 minutes
- Total time: 12 minutes
- Servings: 4
- Difficulty level: Easy
Ingredients You’ll Need for Spooky Baked Halloween Chips
- 4 flour tortillas (use gluten-free or grain-free for dietary preferences)
- Spray avocado or olive oil (helps to achieve a crispy texture)
- Salt (for seasoning)
- Halloween cookie cutter (to create fun shapes)

here
How to Make Spooky Baked Halloween Chips
-
Preheat the Oven
Preheat your oven to 375°F (190°C). Lightly grease a baking sheet with your oil spray. -
Cut the Tortillas
Working one tortilla at a time, use your ghost-shaped cookie cutter to cut out chip shapes. You can typically get 5-6 ghosts from each tortilla. For less waste, try to place the cutters as close together as possible. -
Prepare for Baking
Transfer the cut-out chips onto your prepared baking sheet. Make sure they are laid out in a single layer for even cooking. -
Add Oil and Salt
Lightly mist the tortilla shapes with avocado or olive oil spray, then sprinkle a pinch of salt over the top. -
Bake the Chips
Bake in the preheated oven for about 5-7 minutes, or until they are lightly golden and crispy. Keep an eye on them to avoid burning! -
Serve and Enjoy
Allow the chips to cool slightly before serving. They’re best enjoyed with salsa, guacamole, or even a comforting Pumpkin Taco Soup!
Tips for Success
- Don’t Overcrowd: Make sure to give enough space between each chip on the baking sheet for even crispiness.
- Watch Closely: Oven times can vary, so check the chips frequently to ensure they don’t burn.
- Experiment with Shapes: Use different cookie cutters to create a variety of festive shapes for any occasion.
- Adjust Seasoning: Feel free to add other spices like chili powder, garlic powder, or paprika to customize the flavor.
- Store Leftovers Properly: If you have any leftover chips, store them in an airtight container to maintain their crispness.
Easy Variations
- Corn Tortillas: Swap flour tortillas for corn tortillas for a different flavor and texture.
- Spice It Up: Add a sprinkle of cayenne pepper or paprika for a slightly spicy kick.
- Cheesy Chip: Dust the chips with nutritional yeast before baking for a cheesy flavor without dairy.
- Herb-Infused: Incorporate dried herbs such as oregano or rosemary into the salt for an aromatic twist.
- Sweet Treats: For a dessert version, sprinkle with cinnamon sugar instead of salt before baking.
What to Serve with Spooky Baked Halloween Chips
- Salsa: A classic pairing, salsa adds a refreshing flavor that complements the chips well.
- Guacamole: Creamy, rich guacamole makes for a satisfying contrast to the crunchy chips.
- Pumpkin Taco Soup: The flavors of seasonal pumpkin and spices in this savory soup create a cozy pairing.
- Creamy Spinach Dip: This velvety dip works beautifully with the crisp texture of the chips.
- Hummus: A healthy, protein-packed option that pairs perfectly for a crunchy bite.
Storage and Reheating
- Refrigerator Storage: Store any leftover chips in an airtight container at room temperature for up to 2 days.
- Freezer Storage: These chips can be frozen for up to a month; just ensure they’re in a sealed container or bag.
- Best Reheating Method: To restore crispness, reheat in the oven at 350°F (175°C) for about 5 minutes.
- Preserve Texture: Avoid microwaving, as it can make the chips soggy.
Common Mistakes to Avoid
- Cutting Too Thick: Ensure the chips are cut thinly enough for proper crisping.
- Not Preheating: Always preheat the oven for even baking results.
- Using Too Much Oil: A light mist of oil is sufficient; too much can make the chips greasy instead of crispy.
- Baking Individual Batches: Baking too many tortillas at once can lead to uneven cooking; make them in small batches if needed.
Spooky Baked Halloween Chips: Background & Cultural Inspiration
This festive snack draws inspiration from traditional chip-making techniques but adds a fun seasonal twist perfect for Halloween gatherings. The use of cookie cutters to create whimsical shapes not only makes them more appealing to kids but also embraces the creativity of holiday cooking. Since Halloween often revolves around fun and light-hearted themes, these chips are a cute way to bring excitement to your table while still enjoying a healthier snack option.
Frequently Asked Questions
Can I use different types of tortillas?
Yes, you can definitely use corn or grain-free tortillas if you prefer. Just note that the texture may differ slightly.
How do I know when my chips are done baking?
Your chips should be lightly golden in color and crispy to the touch. Keep an eye on them towards the end of the cooking time.
Can I prepare the chips ahead of time?
Absolutely! You can cut and store the shaped tortillas in the fridge before baking. Just bake them just before serving for the best texture.
What dips pair well with these chips?
These chips can be served with a variety of dips such as salsa, guacamole, hummus, or even a creamy spinach dip.
How can I make these chips spicier?
To add some heat, sprinkle a pinch of cayenne pepper or chili powder onto the chips before baking.
Final Thoughts
Spooky Baked Halloween Chips are a delightful addition to your Halloween festivities, offering a simple yet creative way to enjoy healthier snacks. With just a few ingredients and a bit of creativity, you can satisfy your cravings while having fun in the kitchen. Give this recipe a try, and bring some crunchy joy to your Halloween celebrations!
PrintSpooky Baked Halloween Chips

Celebrate Halloween with these fun and crispy baked tortilla chips, perfect for pairing with your favorite dips.
- Prep Time: 5 minutes
- Cook Time: 7 minutes
- Total Time: 12 minutes
- Yield: 4 servings
- Category: Snack
- Method: Baking
- Cuisine: American
- Diet: Gluten-Free, Paleo
Ingredients
- 4 flour tortillas (use gluten-free or grain-free for dietary preferences)
- Spray avocado or olive oil (helps to achieve a crispy texture)
- Salt (for seasoning)
- Halloween cookie cutter (to create fun shapes)
Instructions
- Preheat your oven to 375°F (190°C). Lightly grease a baking sheet with your oil spray.
- Cut one tortilla at a time using your ghost-shaped cookie cutter to create chip shapes.
- Transfer the cut-out chips onto your prepared baking sheet, laid out in a single layer.
- Add a light mist of avocado or olive oil spray, then sprinkle with a pinch of salt.
- Bake in the preheated oven for about 5-7 minutes, until golden and crispy.
- Serve after letting the chips cool slightly, and enjoy with your favorite dips!
Notes
Keep an eye on the chips to prevent burning and allow for some space between them while baking for optimal crispiness.