
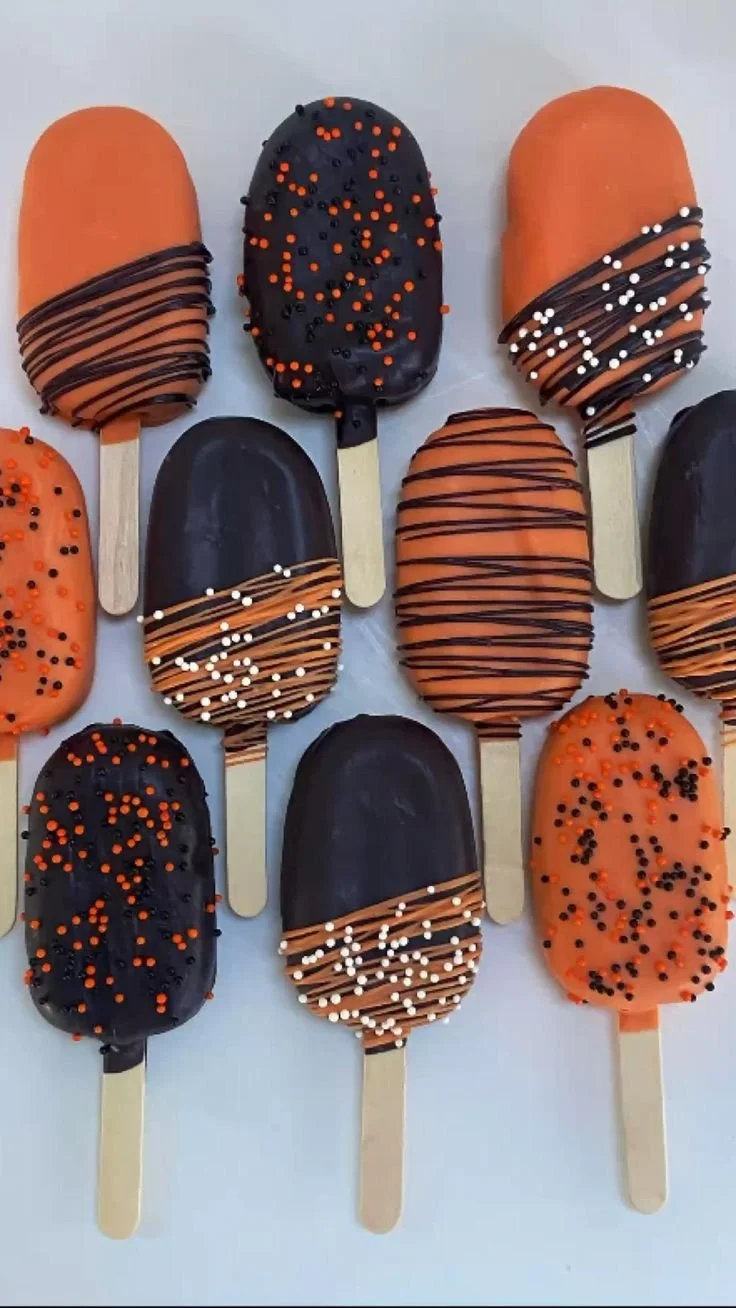
The Halloween cakesicles are a delightful and festive treat that everyone will love! Perfect for celebrating the spooky season, these playful cakes on a stick are both fun to make and eat. They combine the joy of cake pops with a creative Halloween twist, making them an ideal choice for parties, gatherings, or family-friendly celebrations.
Why You’ll Love Halloween Cakesicles
-
Fun and Festive Presentation: Halloween cakesicles are visually striking, featuring playful designs that embody the spirit of the holiday. From ghostly shapes to pumpkin designs, they make a charming display on any dessert table.
-
Easy to Customize: You can easily tailor these cakesicles to your preferences. Use different cake flavors, fillings, and decoration styles to suit your festivity or the tastes of your guests.
-
Portable Treat: Sticking a cake on a stick makes it incredibly easy to eat while mingling at parties. They’re perfect for kids and adults alike who enjoy a sweet treat without the mess of traditional slices of cake.
-
Great for Batch Making: These cakesicles are perfect for making in large quantities. They can be prepared in advance, stored, and served when needed, making them ideal for busy holiday hosting.
-
Creative Outlet: Decorating cakesicles can be a fun and creative process, allowing bakers of all skill levels to express their artistry. Get the kids involved and let them come up with spooky designs!
Recipe Overview
- Prep Time: 30 minutes
- Cook Time: 20 minutes
- Total Time: 50 minutes
- Servings: 12 cakesicles
- Difficulty Level: Easy
Ingredients You’ll Need for Halloween Cakesicles
Cake Base
- 1 box of your favorite cake mix (Plus ingredients needed for baking, e.g., eggs, oil, water)
- 1 cup of frosting (Store-bought or homemade; any flavor that complements your cake)
Coating
- 1 ½ cups of candy melts or chocolate chips (Choose a mix of colors for decoration)
- Sprinkles or edible decorations (Halloween-themed for a festive touch)
Supplies
- Cakesicle molds (Silicone works best for easy removal)
- Lollipop sticks

How to Make Halloween Cakesicles
Step 1: Bake the Cake
Prepare your cake mix according to the package instructions. Bake it in a 9×13-inch pan or according to the recommendations for your specific mix. Allow the cake to cool completely once baked.
Step 2: Crumble the Cake
Once the cake is fully cooled, crumble it into a large mixing bowl. Make sure there are no large chunks remaining, as the finer the crumbs, the better the cakesicles will hold together.
Step 3: Mix with Frosting
Add the frosting to the crumbled cake mixture, one spoonful at a time. Mix it with your hands or a spatula until it’s well combined. The mixture should be moist enough to hold together but not overly sticky.
Step 4: Shape the Cakesicles
Scoop out portions of the mixture and press them into the cakesicle molds, filling them about ¾ full. Insert a lollipop stick into each mold and gently press it down until it’s about halfway through the mixture. Continue until all molds are filled.
Step 5: Chill the Cakesicles
Place the filled molds into the freezer for about 30 minutes. This will help the cakesicles firm up, making them easier to coat and decorate.
Step 6: Prepare the Coating
While the cakesicles are chilling, melt the candy melts or chocolate chips according to the package instructions. Stir until smooth and fully melted.
Step 7: Coat the Cakesicles
Remove the molds from the freezer. Carefully pop out each cakesicle and dip it into the melted coating, ensuring it’s fully covered. Allow excess coating to drip off before placing the cakesicle on a cooling rack or parchment paper.
Step 8: Decorate
While the coating is still wet, sprinkle your Halloween-themed decorations on top. Use contrasting colors for a striking appearance. Allow the coating to set fully before serving or storing.
Tips for Success
-
Cool Cake Thoroughly: Ensure your cake is completely cool before crumbling and mixing; warm cake can make the mixture too wet.
-
Moisture Control: Don’t overload the frosting; start with a smaller amount and add more if necessary, as too much can make the mixture sticky.
-
Chill for Firmness: If your cakesicle mixture feels soft, another brief chill in the freezer can help firm things up before coating.
-
Melt Candy Slowly: When melting candy melts or chocolate, do so slowly to avoid burning. Use short bursts in the microwave, stirring between intervals.
-
Get Creative with Sprinkles: Play around with different sprinkle shapes and colors to create fun designs that fit your Halloween theme.
Easy Variations
-
Different Cake Flavors: Substitute the cake mix with your favorite flavors such as red velvet, chocolate, or pumpkin to match the seasonal theme.
-
Alternative Coatings: Instead of traditional chocolate, use white chocolate or royal icing for unique flavors and looks.
-
Add Fillings: Consider adding a surprise center, like caramel sauce or raspberry jam, in the middle of each cakesicle for an exciting twist.
-
Dairy-Free Option: Use a dairy-free cake mix and frosting for a delicious vegan-friendly version.
-
Spice it Up: Add spices like cinnamon or nutmeg to the cake mix to give a seasonal flavor profile, especially delightful for fall.
What to Serve with Halloween Cakesicles
-
Hot Apple Cider: The warm spice of apple cider pairs wonderfully with the sweetness of cakesicles, making for a cozy combination.
-
Pumpkin Flavored Treats: Include pumpkin muffins or pie; it’ll complement the autumn theme and enhance your dessert table.
-
Cheesecake Bites: These rich bites provide a contrasting texture and flavor, balancing the sweet cakesicles.
-
Spooky-Themed Snacks: Offer ghost-shaped cookies or candy corn for fun, themed options that keep with the holiday spirit.
-
Fruit Platter: A fresh fruit platter can offer a refreshing balance to the sweets, making it a well-rounded dessert experience.
Storage and Reheating
-
Refrigerator Storage: Store cakesicles in an airtight container in the refrigerator for up to a week.
-
Freezer Storage: For longer storage, wrap individual cakesicles in plastic wrap and place them in a freezer-safe container. They can be frozen for up to three months.
-
Best Reheating Method: To enjoy them just slightly warmed, let them sit at room temperature for 15-20 minutes. Avoid using a microwave, as it can alter the texture.
-
Meal Prep Note: These cakesicles are perfect for make-ahead treats as they freeze well, making them a great option for ahead-of-time preparations for Halloween parties.
Common Mistakes to Avoid
-
Not Letting the Cake Cool: Placing warm cake in the mixture can yield an overly crumbly or soupy texture.
-
Overfilling the Molds: Fill the molds just enough for a compact shape; overfilling can cause a messy outcome.
-
Skipping the Chill Time: Rushing through the chilling step may lead to cakesicles falling apart during coating.
-
Using Too Much Coating: Ensure you shake off excess coating to prevent a heavy, dripping effect.
Halloween Cakesicles: Background & Cultural Inspiration
Halloween cakesicles draw inspiration from traditional cake pops but embrace the spooky spirit of Halloween. Cakesicles are an imaginative way to celebrate the season, known for their eye-catching decorations. Celebrated mostly in the United States, Halloween is the perfect time for bakeries and home cooks alike to push creativity with sweets. The colorful shapes and flavors reflect the vibrancy of the autumn season, making these treats not only delicious but also visually appealing.
Frequently Asked Questions
Can I use a homemade cake recipe instead of a box mix?
Absolutely! A homemade cake can yield great results, just be sure it’s tender and moist for the best cakesicle consistency.
How can I make these cakesicles gluten-free?
Choose a gluten-free cake mix, and ensure all additional ingredients, like frosting and candy melts, are gluten-free as well.
Can I prepare cakesicles a day in advance?
Yes, they can be made a day in advance. Store them in an airtight container to keep them fresh.
What’s the best way to decorate cakesicles?
Feel free to use dipping chocolate, melted candy melts, or even colored icing to create fun designs. Experimenting with sprinkles and edible decorations can create visually stunning treats.
How can I avoid my cakesicles melting in warm weather?
Keep your cakesicles chilled until just before serving. Use insulated containers for storage if you’re taking them outdoors.
Final Thoughts
Halloween cakesicles are a must-try treat that brings joy and creativity into the kitchen. Their festive design and easy preparation make them ideal for any Halloween gathering. With endless possibilities for decoration and flavor, they’re not only rewarding to make but also a pleasure to share. So gather your ingredients and get ready to delight your friends and family with these charming and delicious cakesicles!
PrintHalloween Cakesicles
Delightful and festive Halloween cakesicles that are fun to make and eat, perfect for celebrating the spooky season.
- Prep Time: 30 minutes
- Cook Time: 20 minutes
- Total Time: 50 minutes
- Yield: 12 cakesicles
- Category: Dessert
- Method: Freezing
- Cuisine: American
- Diet: Vegetarian
Ingredients
- 1 box of your favorite cake mix (Plus ingredients needed for baking, e.g., eggs, oil, water)
- 1 cup of frosting (Store-bought or homemade)
- 1 ½ cups of candy melts or chocolate chips
- Sprinkles or edible decorations (Halloween-themed)
- Cakesicle molds (Silicone works best)
- Lollipop sticks
Instructions
- Bake the Cake: Prepare your cake mix according to the package instructions. Bake in a 9×13-inch pan and allow to cool completely.
- Crumble the Cake: Once cooled, crumble the cake into a large mixing bowl.
- Mix with Frosting: Add frosting to crumbled cake, mixing until well combined.
- Shape the Cakesicles: Press the mixture into the molds, filling them about ¾ full and insert lollipop sticks.
- Chill the Cakesicles: Place filled molds into the freezer for about 30 minutes.
- Prepare the Coating: Melt candy melts or chocolate according to package instructions.
- Coat the Cakesicles: Dip each cakesicle into the melted coating, shaking off excess.
- Decorate: While coating is wet, sprinkle on decorations. Allow to set before serving.
Notes
Use contrasting colors for decorations for a striking appearance. Make sure the cake is thoroughly cooled before crumbling.