
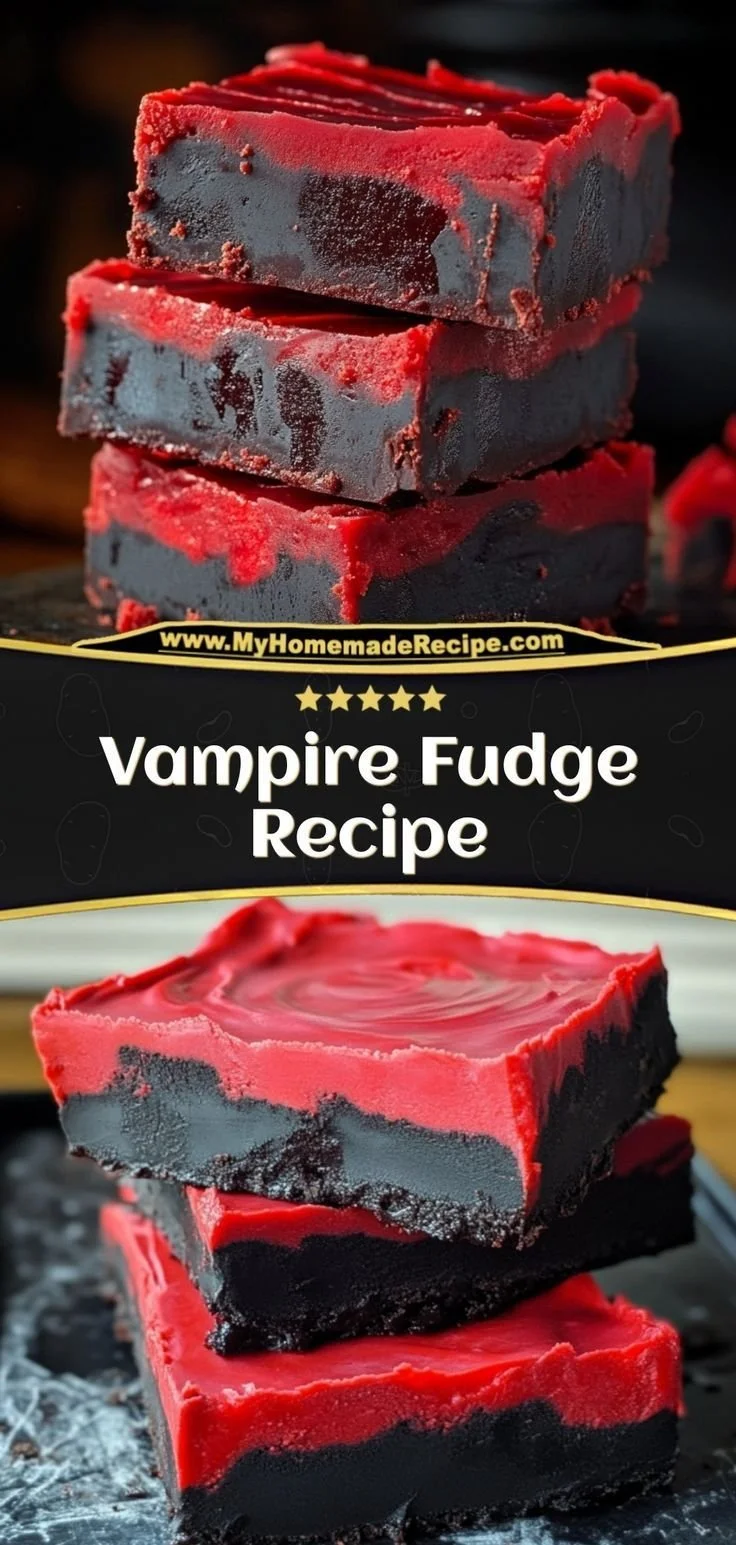
The Vampire Fudge Recipe is a delightfully spooky treat that’s perfect for Halloween or any time you want to indulge in something rich and creamy. This delectable fudge not only satisfies your sweet tooth but also adds a playful touch to your dessert table. With its easy preparation and festive presentation, it’s worth making for parties or simply to enjoy at home.
Why You’ll Love Vampire Fudge
- Simple Ingredients: With just a handful of easy-to-find ingredients, you can whip up this fudge in no time.
- Quick to Prepare: Spend less time in the kitchen with a fast prep and cooling time – perfect for busy days or last-minute treats.
- Customizable Flavors: The base recipe allows for a multitude of flavor options, so you can tailor it to your taste.
- Eye-Catching Presentation: This fudge’s vibrant colors make it a staple for Halloween parties, drawing attention and delight.
- Family Fun: Making this fudge can be a fun activity to do with kids or friends, creating sweet memories along the way.
Recipe Overview
- Prep Time: 15 minutes
- Cook Time: 5 minutes
- Total Time: 2 hours (including cooling)
- Servings: 12 servings
- Difficulty Level: Easy
Ingredients You’ll Need for Vampire Fudge
- 2 cups chocolate chips: Use semi-sweet for a balanced flavor or dark for more richness.
- 1 can (14 oz) sweetened condensed milk: This is essential for creating the creamy texture.
- 1 teaspoon vanilla extract: Adds depth to the flavor.
- Food coloring: Red and black for the spooky aesthetic; adjust according to preference.
- Optional toppings: Sprinkles or crushed Halloween candies for added fun.

How to Make Vampire Fudge
-
Prepare Your Pan
- Line an 8-inch square baking dish with parchment paper, leaving some overhang so you can lift it out later. This makes cutting the fudge easier.
-
Melt the Chocolate
- In a medium saucepan, combine the chocolate chips and sweetened condensed milk over low heat. Stir constantly until the chocolate is completely melted and smooth.
-
Add Flavor
- Remove the saucepan from heat and stir in the vanilla extract until well combined.
-
Color the Fudge
- Divide the melted mixture into two bowls. In one bowl, add red food coloring until you reach your desired hue. In the other bowl, add black food coloring in a similar manner.
-
Layer the Fudge
- Pour half of the red fudge into the prepared baking dish and spread it evenly. Then, layer on the black fudge, and finally top with the remaining red fudge. Use a toothpick to create swirls for a marbled effect.
-
Chill
- Refrigerate the fudge for about 2 hours, or until it is firm to the touch.
-
Slice and Serve
- Once set, lift the fudge out using the parchment paper. Cut into squares and serve!
Tips for Success
- Consistency Matters: Ensure the chocolate is fully melted and smooth to avoid any grainy texture.
- Get Creative with Color: Don’t hesitate to mix colors or create your designs; this is about having fun!
- Use a Sharp Knife: To get clean cuts, use a hot knife (dip it in hot water, then dry) when slicing the fudge.
- Proper Storage: Keep the fudge stored in an airtight container to maintain freshness and avoid drying out.
- Cool Completely: Make sure the fudge is completely set before cutting to avoid it falling apart.
Easy Variations
- Nutty Addition: Stir in some chopped nuts for a crunchy texture.
- Swirled Flavors: Incorporate layers of peanut butter fudge or white chocolate for a twist.
- Spicy Kick: Add a pinch of cinnamon or cayenne pepper for a unique flavor contrast.
- Vegan Option: Use dairy-free chocolate chips and coconut milk for a vegan-friendly version.
- Seasonal Adjustments: For other holidays, change the food coloring and add themed sprinkles accordingly.
What to Serve with Vampire Fudge Recipe
- Hot Chocolate: This sweet treat pairs perfectly with a warm cup of hot chocolate for a cozy dessert experience.
- Vanilla Ice Cream: A scoop on the side balances the rich fudge with its creaminess.
- Coffee: The bitterness of coffee offsets the sweetness of the fudge nicely.
- Pumpkin Bread: An autumn staple, combining pumpkin bread with fudge can create a delightful flavor profile.
Storage and Reheating
- Refrigerator Storage: Keep the fudge in an airtight container in the refrigerator for up to two weeks.
- Freezer Storage: To extend its life, freeze the fudge in an airtight container or wrap it with plastic wrap and foil for up to 3 months. Thaw overnight in the refrigerator before serving.
- Best Reheating Method: Generally, this fudge is best enjoyed chilled, but if you want it softer, let it sit at room temperature for a bit before cutting.
- Meal Prep Note: Perfect for making ahead of events and gatherings; just ensure it’s stored correctly.
Common Mistakes to Avoid
- Not Melting Chocolate Properly: Avoid overheating chocolate, which can cause it to seize.
- Skipping the Cooling Step: Cutting the fudge before it sets will make it crumbly.
- Using the Wrong Pan: Ensure the pan is lined and the right size to avoid thinning out the fudge.
- Not Mixing Colors Well: Ensure that the food coloring is evenly mixed to achieve the desired look.
- Cutting Too Soon: Patience pays off; wait until fully cooled for neat slices.
Vampire Fudge: Background & Cultural Inspiration
Vampire fudge draws inspiration from Halloween traditions that celebrate all things spooky. Fudge itself has origins that trace back to the United States in the late 19th century, where it became popular for its rich flavor and smooth texture. The playful twist on appearance with vibrant colors aligns perfectly with Halloween festivities, embodying both the fun spirit of the season and the joy of sweets. This recipe connects with the tradition of baking treats for friends and family, offering a delicious way to celebrate spooky times together.
Frequently Asked Questions
Can I use regular milk instead of sweetened condensed milk?
Regular milk won’t yield the same creamy, thick texture as sweetened condensed milk. Stick to the original ingredient for the best results.
How can I adjust the sweetness of the fudge?
Consider reducing the amount of chocolate chips or adjusting the brand you use. Dark chocolate options have less sugar compared to semi-sweet chocolates.
Is it possible to make this fudge dairy-free?
Yes! Use dairy-free chocolate chips and an appropriate alternative for sweetened condensed milk, such as coconut milk.
How long will the fudge last?
When stored properly in an airtight container, it can last up to two weeks at room temperature or up to three months in the freezer.
Can I make the fudge ahead of time?
Absolutely! This fudge is great for making ahead of time, especially for gatherings or as holiday treats. Just ensure it’s stored appropriately.
Final Thoughts
The Vampire Fudge Recipe is not just a delicious treat but also a delightful activity that brings joy to any gathering. Its simplicity and versatility make it an excellent choice for both seasoned bakers and beginners alike. Whether you’re celebrating Halloween or simply indulging yourself, this recipe is bound to satisfy and impress. Try it today and enjoy the fun of creating something special!
PrintVampire Fudge

A delightfully spooky treat perfect for Halloween, rich and creamy Vampire Fudge adds a playful touch to your dessert table.
- Prep Time: 15 minutes
- Cook Time: 5 minutes
- Total Time: 120 minutes
- Yield: 12 servings
- Category: Dessert
- Method: Refrigeration
- Cuisine: American
- Diet: Vegetarian
Ingredients
- 2 cups chocolate chips (semi-sweet or dark)
- 1 can (14 oz) sweetened condensed milk
- 1 teaspoon vanilla extract
- Food coloring (red and black)
- Optional toppings (sprinkles or crushed Halloween candies)
Instructions
- Line an 8-inch square baking dish with parchment paper.
- Combine the chocolate chips and sweetened condensed milk in a saucepan over low heat.
- Stir constantly until the chocolate is completely melted.
- Remove from heat and stir in the vanilla extract.
- Divide the mixture into two bowls with food coloring.
- Pour half of the red fudge into the baking dish and spread evenly.
- Layer with black fudge and remaining red fudge.
- Refrigerate for about 2 hours until firm.
- Lift out using parchment paper and cut into squares.
Notes
Ensure the chocolate is fully melted to avoid a grainy texture. Use a hot knife for clean cuts.